

How Do I Plan For Toilet Size In Drawing
FLOOR PLAN IDEAS
Apply these sample flooring plans to gather ideas about placement of elements. Whatever the size of your bath, keep in heed that the more walls that contain plumbing pipes, the higher the cost tag. If upkeep is a business organization, limit plumbing equipment to one wall; for the greatest design flexibility, opt for a 3-wall layout.
Double the Condolement
Are you planning a master bathroom that tin can easily conform two users during the morning rush hour? Consider including a separate shower-or meliorate notwithstanding, a walk-in shower with multiple shower heads. Install dual vanities on divide walls to enhance convenience, and include the toilet in a private enclosure.
Measuring Tips
Footstep 1: Measure the Overall Room
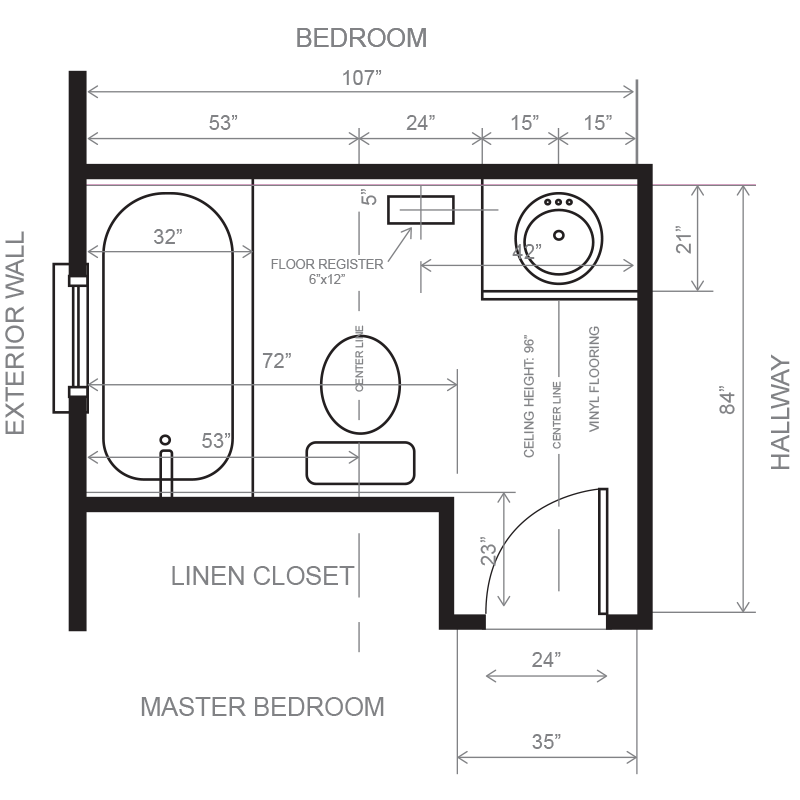
Depict a diagram of your bathroom, locating all windows and doors in their approximate positions. Annotation on the drawing the overall wall lengths of each wall. Start at the door opening and keep clockwise around the room.
Notes:
- All of your measurements should be in inches. For instance, if you measure a wall that is 10 feet, write information technology as 120 inches - a quotation marking (") denotes inches.
- For doorways with hinged doors, describe the door according to which mode the door swings.
- If y'all are replacing the cabinets, do include current cabinets or piece of furniture such equally pedestals, commodes or linen cabinets in your measurements (width 10 height ten depth). Yet, take the measurements of any furniture you want to include in your new bathroom. Accept photographs of these items. Their placement in the new bathroom is part of the design process.
- Do indicate the precise location of the center-line of the current toilet, bidet, sink or vanity, and bathtub and/or shower. In the shower, measure the center of the drain from the 2 closest ninety° walls. Show the location of the shower arm and head. If your toilet is wall-mounted, write "wall-mounted" next to the toilet.
Step 2: Label and Measure Doors and Windows
- Get-go at the superlative left comer of your drawing measure to the first window, door, or wall. Go on clockwise around the room until each wall, window and door has been measured. Remember, all measurements are in inches.
- Beginning at the top left of your drawing, label the windows 'Window #1 ", "Window #2", etc. in a clockwise guild ...
- Again, beginning at the summit left of your cartoon, characterization the doors "Door #1 ", "Door #2", etc. in a clockwise order.
- Adjacent to each wall, write the proper name of the adjacent room. If the wall is an "outside wall" write "exterior wall." If the room is a candidate for expanding the bathroom, also measure that room.
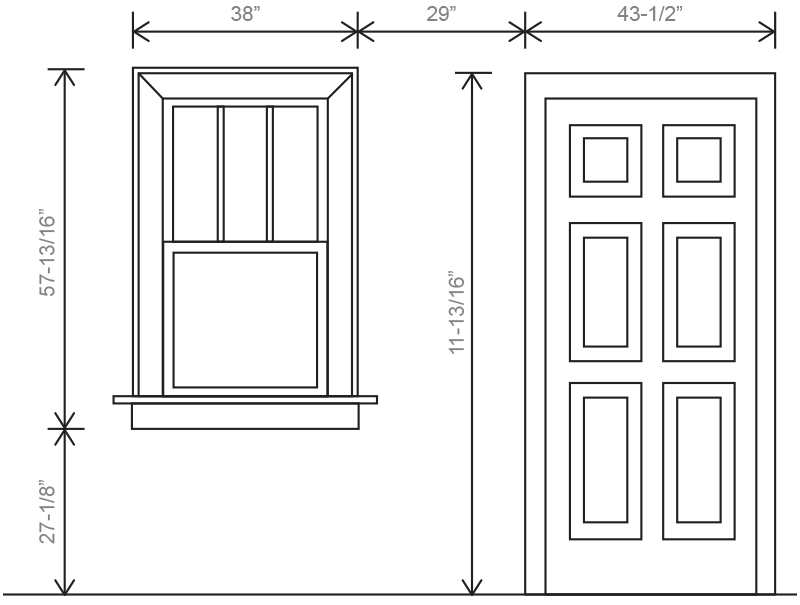
- As shown in Diagram 2, measure from the floor to the bottom of each window and also measure the overall window height.
Notes: When measuring doors and windows the trim is considered office of the door or window. Measure out from the exterior of the trim on one side to the outside of the trim on the other side, then from the outside of the trim to the middle of the window or door.
- Using a table like Diagram 3, tape the measurements for all windows. Be sure that each window is accurately labeled.
- Note if the home is a condo or single family. If condo, what floor? Also, what is the maximum sizes that the lift will adjust. Single Family, annotation if located on the st i floor, 2d floor, or lower level.
- Note on the cartoon the accessibility to the space and take photos. For example, the room may allow for a 72" tub, only the tub is non able to make the breadbasket in the hallway to the bathroom.
- Note space as: Master Bathroom, Hall/Guest Bath, Jack & Jill Bath, Powder Room
Stride 3: Identify and Measure out Unmovable Obstructions
- Draw boxes in your diagram to evidence the approximate location of any obstructions such equally radiators, vents, pipes, exposed plumbing, smoke detectors, cardinal vac., etc. that you either cannot move or exercise not want moved. Characterization the object what it is: i.e. "radiator", "pipage", etc.
- Measure the obstruction and tape the width, height, and depth of the obstruction on obstruction reaches the ceiling, omit the height measurement. If the obstacle is not in contact with the floor, measure from the floor to the bottom of the obstruction. Measure out the distance of the object from the nearest 2 90° walls.
- Mensurate from the nearest wall to the nearest edge of the obstruction. Mensurate from the point on the wall that is nearest the obstacle to the betoken on the obstruction nearest the wall. Measure from the second closest wall to the nearest indicate of the obstruction. Note these measurements on your drawing.
- In structure dimensions of an object are always given in the aforementioned format: width across the front end, then summit, then depth, then the dimension 32"x54"x14" is presumed to hateful 32"west x 54"h x 14"d unless otherwise indicated.
Pace 4: Measure the Superlative of the Ceiling
Measure the ceiling elevation and write it in the center of your drawing. Sometimes, especially with older homes, it is a adept idea to take measurements in a few unlike areas of the bath. Ceiling heights, fifty-fifty in the aforementioned room, can sometimes vary by every bit much equally several inches. If it varies, write down both the depression and loftier measurements.
Step 5: Bank check your Measurements
Check your measurements. If your room is rectangular add up the measurements of the parallel walls and make sure they friction match (or are at least very close). For example, in our sample drawing, you would take the overall measurements of the top wall and add them together. And so do the same with the bottom wall. Once you lot have added each wall measurements check the totals to see if they friction match.

Source: https://www.henrykitchenandbath.com/bathroom-floor-plans.html
Posted by: gordonlievaight.blogspot.com
0 Response to "How Do I Plan For Toilet Size In Drawing"
Post a Comment