

How To Draw Side Profile Eyes
In this lesson, we'll take a look at how to depict an center. We'll comprehend drawing optics from both a frontal view also as a side view (or profile) with graphite pencils and also white charcoal. 3 step by step examples are included, then be certain to scroll down to see them all.
The middle has been said to exist "the window to the soul". Sometimes nosotros can await at just a person'due south optics and know exactly who they are.
The process is fairly straight-forrard. After drawing out the bones contours, we'll gradually develop the tonal range of the centre. To create the representational result that we're later on, we'll gradually build upwardly layered applications of graphite to develop the value and the texture.
Cartoon Eyes with Pencil
This lesson is focused on teaching you how to depict optics with graphite pencils. Of form, the approach that y'all take is different according to the medium that you lot choose to use.
If you lot'd similar to have a look at how this process is different using different mediums, so the following lessons may be helpful...
- How to Draw an Eye with Colored Pencils
- How to Draw an Heart with Pastels
- How to Paint a Realistic Eye with Oils
If realism is your goal, then patience must be practiced. Merely similar other art-making mediums like colored pencils or pen and ink, graphite applications must be patiently layered and deliberately practical.
Textures develop through layered applications of graphite of varying hardness. Harder pencils, which produce lighter marks, are practical first. Softer pencils are applied on height, pushing values darker. If the softer pencils produce unwanted textures, so boosted applications of harder graphite tin can be applied, working the material into the molar or texture of the paper.
Materials For This Lesson
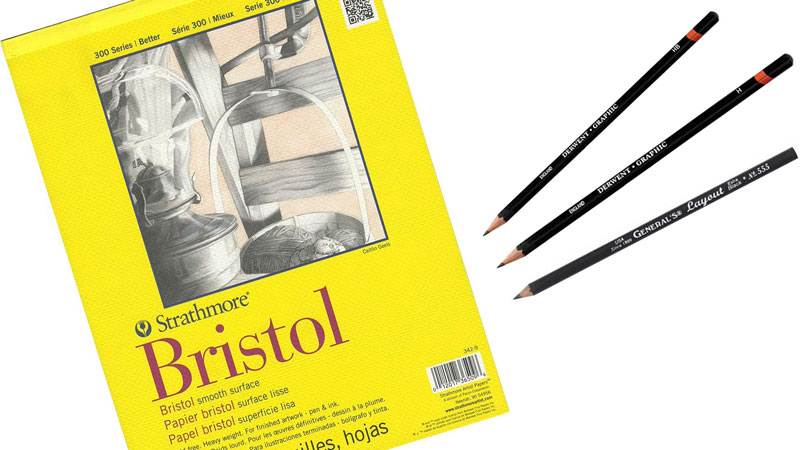
For this drawing lesson, a series of graphite applications are patiently practical on polish Bristol paper. This surface creates smoother transitions of value, simply easily smears.
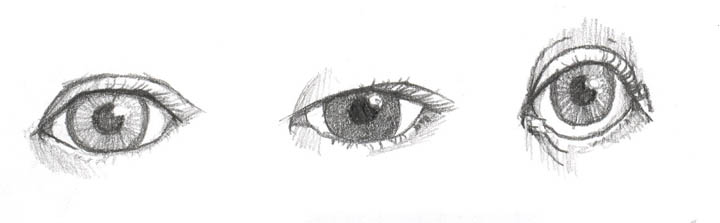
How to Describe an Eye - Step past Step
Here are the steps that nosotros'll have to draw a realistic eye. Each stride is broken downwards in more depth below. It's important to be patient - creating a realistic illusion takes time...
- Draw the contours (outlines) of the center.
- Shade the iris and pupil.
- Shade the whites of the eye, tear duct, and eyelid.
- Develop the skin texture around the center.
- Draw the eyelashes.
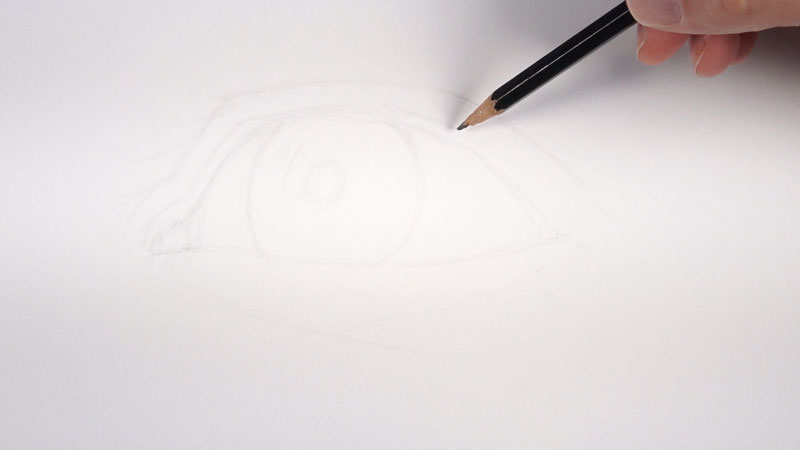
Stride 1 - Draw the Contours (Outlines) of the Eye
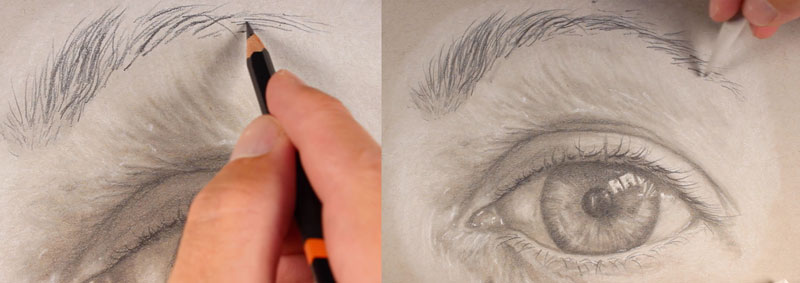
Nosotros'll begin the drawing by lightly and loosely drawing the contour lines of the upper portion and lower portion of the shape of the eye, leaving open up the location of the tear duct. We'll start with the "H" pencil with very little pressure. Within this shape, we'll draw the shape of the iris, pupil, and a shape for the strong highlight that overlaps the pupil slightly.
It'south perfectly acceptable to draw with many lite lines at this phase. We'll progressively place heavier pressure on the pencil as the drawing develops, which will pb to darker marks and values. Be patient and focus on capturing the shape of the heart.
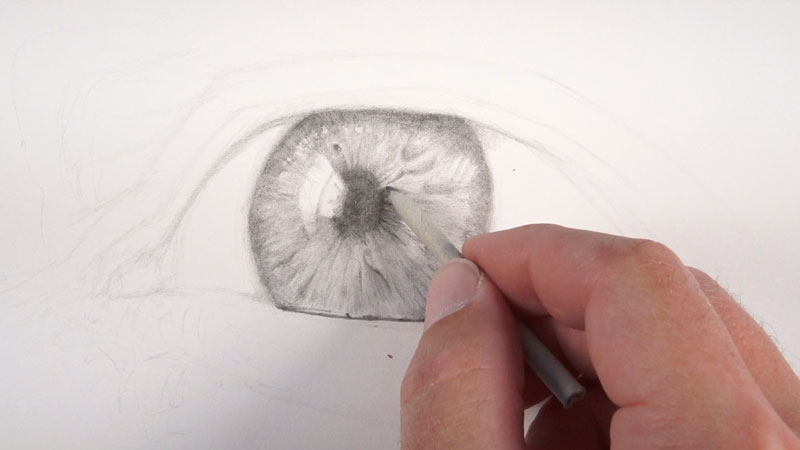
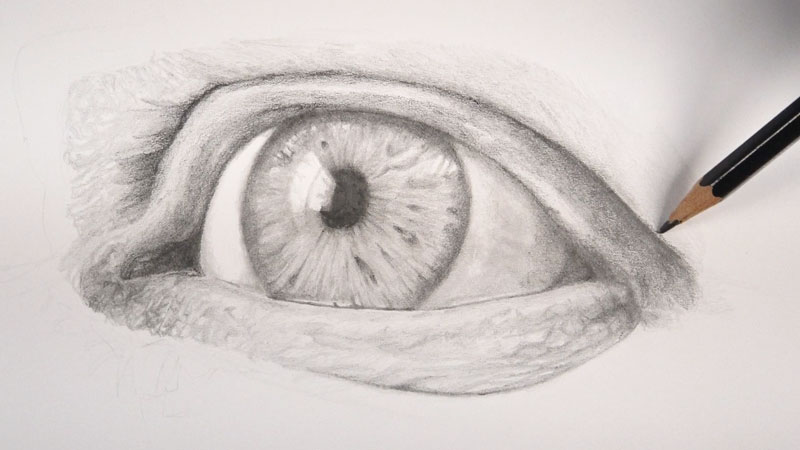
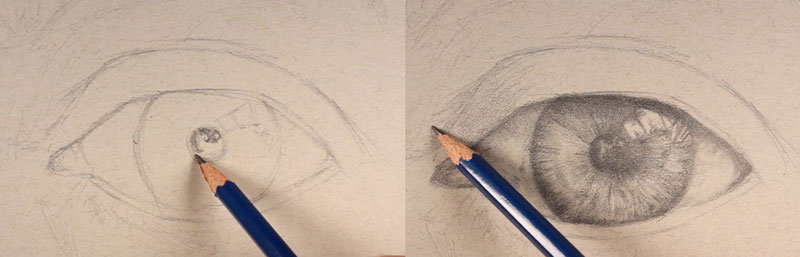
Step 2 - Shade the Iris and the Pupil
Next, we'll begin the slow process of layering values, starting with the darkest values within the educatee. Care is taken to preserve the highlight as darker tones are developed. This highlight will create the illusion that the eye is wet, and so it's very of import to preserve this area. Information technology's much harder to go back and erase out a highlight when working with graphite.
The student will eventually be the area of darkest tone within the cartoon. Nosotros'll slowly build upward the dark values hither. By slowly layering darker applications, we take greater command over the values produced and nosotros can potentially avoid "graphite polish". Graphite shine happens when heavy applications of graphite are applied and flatten the molar or texture of the paper, resulting in a very shiny area of graphite.
Inside the iris, marks are made radiating from the centre. While most of the darker marks are linear, a few class organic shapes. By gradually adjusting the values in this area, nosotros tin can brainstorm to create a more than realistic appearance. The iris is actually made upwards of two closely layered sections - the stroma and pigmented epithelial cells underneath. Past gradually adjusting values, we can develop a subtle, 3-dimensional appearance.
The outer and inner portions of the iris are developed with slightly darker values.
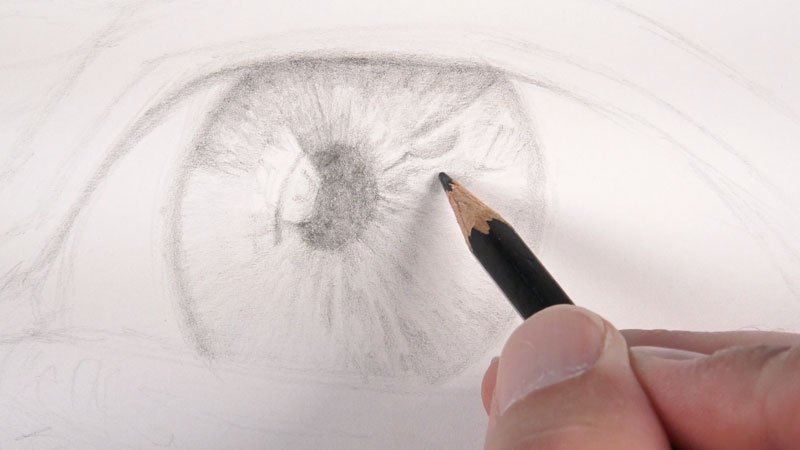
While the "H" pencil lays the groundwork, we'll demand to beginning pushing the values darker. A slightly darker and softer "HB" pencil is applied to progressively darken the values in the pupil and the surrounding iris.
In whatsoever heart that you draw, in that location will be inconsistencies and unusual shapes. Y'all may notice small spots of darker tones or wavy lines. We'll need to include these details in order to create a cartoon that is realistic. We'll begin to develop these "imperfections" with the HB pencil over the lighter H applications already in place.
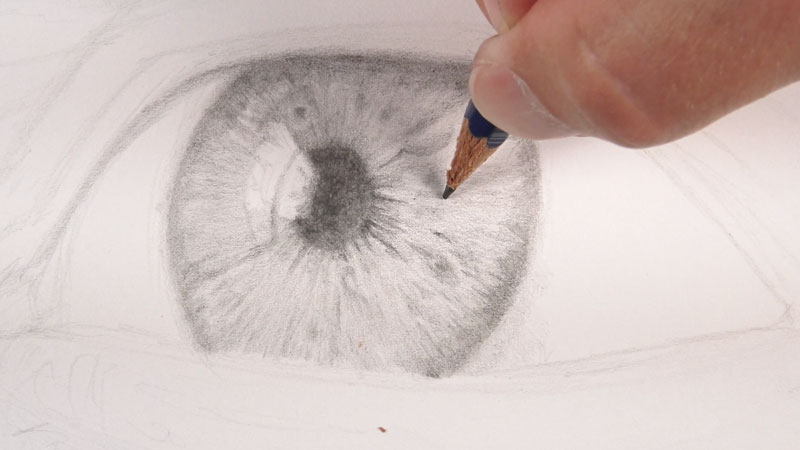
The texture of the iris is smoothen and this should be reflected in our cartoon. Although the surface of the paper on which we're working is already very smoothen, the texture of the paper is however axiomatic. This means we'll demand to modify the graphite applications to create a more natural illusion of texture.
A blending stump is gently used to soften the texture. The blending stump is pulled in the same management as the strokes made with the pencil to preserve the pattern of lines and shapes within the iris.
Later the blending stump has been applied, you may find that the contrast betwixt the values has been muted slightly. If this is the case, you can revisit the iris with the HB pencil and restore some of the contrast lost. Doing so volition only create additional depth to the drawing.
Now that nosotros have a base application of lighter graphite in place, nosotros can switch to a darker graphite pencil. In this case, a General's Layout pencil is used. This pencil is equivalent to a 4B pencil in darkness - even so, it is relatively hard, meaning that it keeps a sharper betoken for a longer period of time.
We'll then continue to slowly build upwards darker values with the darker pencil, making sure that we continue to preserve the strong highlight that overlaps the iris and the student. As we continue to develop the darker tones, the contrast and range of value increases in the drawing.
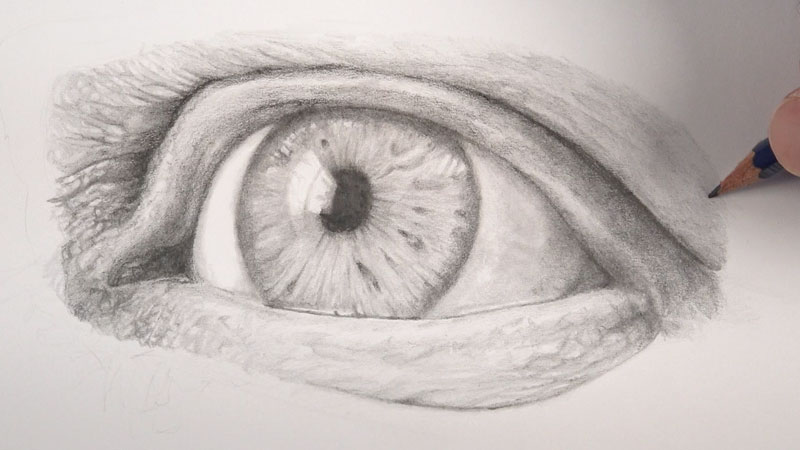
Footstep 3 - Shade the Whites of the Eye, Tear Duct, and Eyelid.
After darkening the values of the student and iris a bit further with the darkest graphite pencil, our attention now turns to the other areas within the eye. A gentle application of the "H" pencil is practical to the "white" of the centre on the right side. Recall, the eyeball is a sphere. This means that the values volition be slightly darker on each edge of the eyeball. In this example, nosotros see that the shadow is rather strong on the right side, since the calorie-free source is originating from the left.
The tear duct is also darkened, leaving hints of lighter value within. This surface area is too wet, and the preservation of strong highlights hither volition aid to create this illusion.
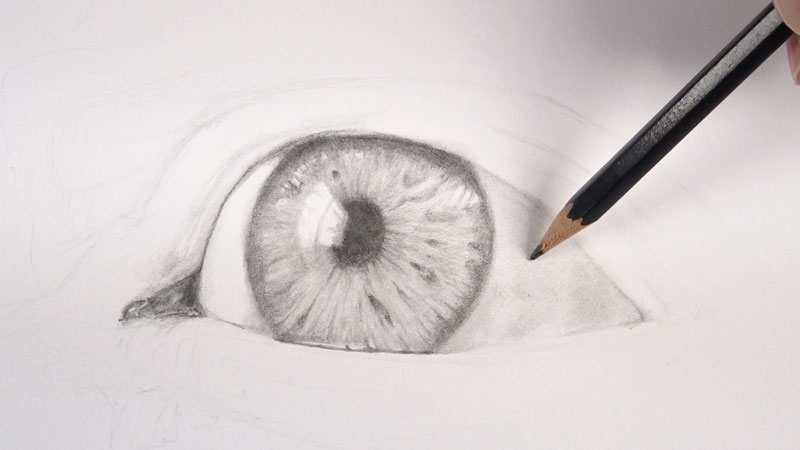
The top eyelid overlaps the eyeball. In nigh cases, the lite source originates from to a higher place, producing a shadow merely underneath the eyelid. A cast shadow can also be found on the eyeball, but underneath the eyelid.
The underside of the eyelid is darkened and the crease higher up it is enhanced. The same process of layering graphite applications is followed - "H", "HB", and "General's Layout Pencil". Every bit graphite is added, we can blend applications with the blending stump, softening the texture.
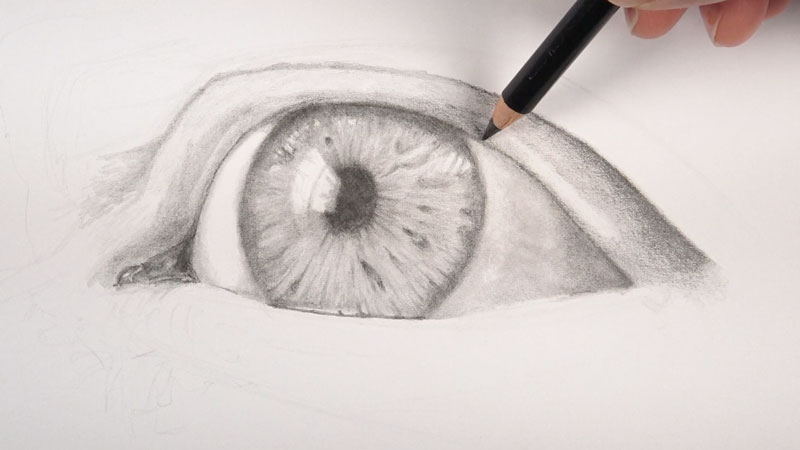

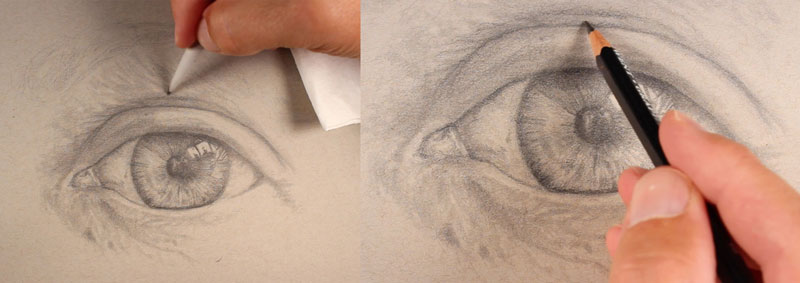
Stride 4 - Develop the Peel Texture Around the Heart
A few visible wrinkles are added on the left side of the upper eyelid crease, before adding a light awarding of graphite on the skin beneath the heart. The textural development of the skin underneath begins by making small-scale shapes, isolating subtle areas of lighter value.
As nosotros have thus far, we'll slowly build up applications to progressively brand the values darker and build up the illusion of texture. A light application of graphite is practical here with the H pencil.
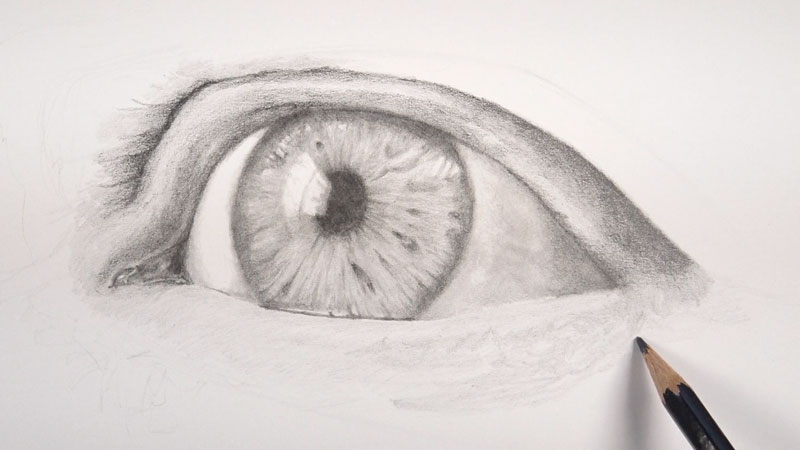
The contrast inside the areas of pare texture is enhanced by progressively making the shapes a fleck darker with applications made with the softer graphite pencils. With a slightly greater range of value, the texture of the skin becomes more realistic. As this happens, areas around the center are also darkened, resulting in more contrast between the eye and the skin around it.
This process is repeated to develop the illusion of pare texture above the eye.
Step 5 - Depict the Eyelashes
With virtually of the layered graphite applications in place, we can add together the eyelashes. With a sharpened "HB" pencil, bold lines are pulled out from the skin. These lines mostly curve down and then up for the top eyelashes, with a few lashes bending in unpredictable means. For the bottom lashes, the opposite is true. The lines are pulled upward and and then downwards. They are less concentrated than those found along the top chapeau.
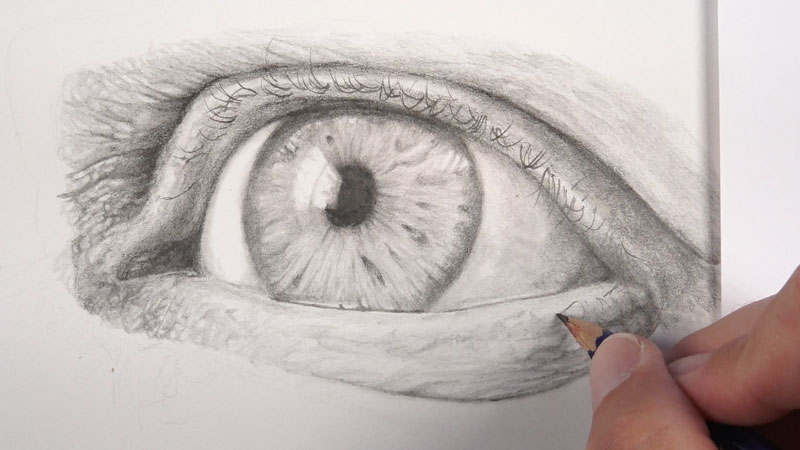
Using the "H" pencil, a few indications of veins inside the eye are added to complete the cartoon.
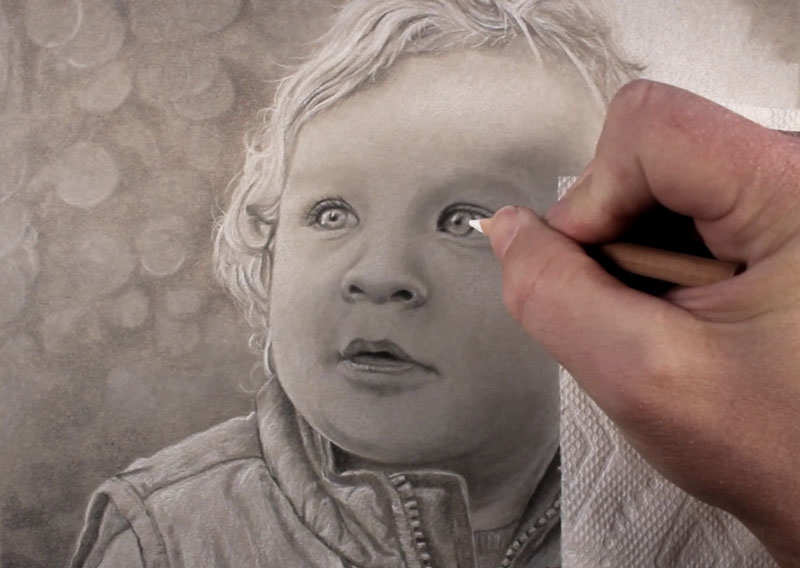
Draw an Middle with Graphite and White Charcoal
At present that we've had a wait at the basics of drawing a realistic eye with graphite alone, permit's take a expect at another example. In this second case, we'll again draw an eye from a frontal view. The following examples come from the course, "Portrait Drawing the Smart Way". Check out the form for instructional videos and ebooks that break down the drawings in more depth.
The Advantage of a Toned Drawing Surface
Earlier, we applied graphite pencils to a white surface. Because we were calculation dark material to a white surface, we were constantly working to darken the values. Highlights were created past leaving the white of the paper "open up", or past applying lite pressure level on the pencil before blending.
When graphite is practical to a white surface, nosotros start at the peak of the value scale (white). We then take to work the values towards the lesser of the calibration in order to create a full range.
This approach is perfectly acceptable, yet you may find that working on a toned cartoon surface gives you an advantage.
When we work on a toned surface, we tin can push the value range in the drawing by starting close to a eye value. This ways that we can use a white drawing medium to add the highlights, instead of relying on the "white" of the newspaper. This approach allows u.s. to push button the values from the eye of the value scale instead of working from one extreme, like white.
This is why many painters choose to apply a "ground" (a base colour other than white) to an empty canvas. It provides a value or tone from which to brainstorm piece of work. With painting, colors and values can be compared to the color and value of the ground equally they are added, assuasive the artist to make improve decisions near the values every bit they paint them.
On a gray cartoon surface, nosotros start with a gray "basis", much like a painter may choose to do.
Identifying and Drawing the Contours of the Eye
We'll outset this cartoon in the same way that we began the last. We'll start evaluate the profile lines or outlines of the eye. We'll look closely and written report the angles and curvature of each of the lines that should be included.
We'll also await for spacial relationships between the "whites" of the optics, the pupil, and the eyelids. By making comparisons, we tin be more authentic with our initial marks.
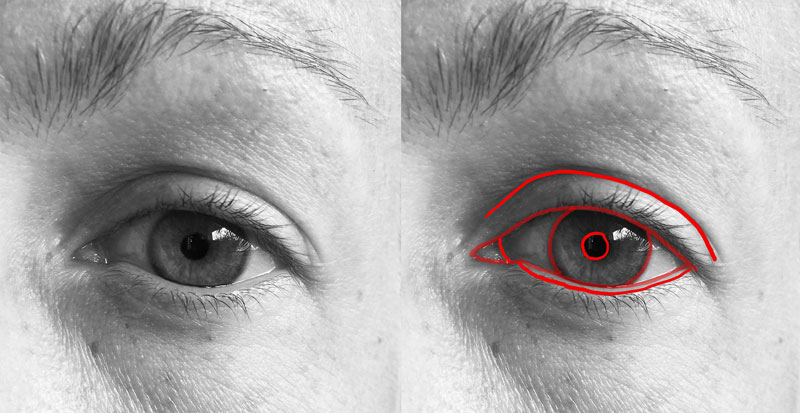
Shading the Center and Developing Highlights
With an understanding of the profile lines, we can begin to make marks with a lite H graphite pencil. We'll draw the contour lines of the educatee, iris, and eyelids. We'll too mark out a shape for the strong highlight. It is this highlight that will brand the eye appear wet.
To make the values slightly darker, we'll switch over to an HB pencil. The pupil is normally the darkest area within the middle, simply yous may notice that some shadows are also rather dark. Nosotros'll gradually push button the values darker. By progressively layering darker and softer graphite pencils, we have complete control over the values. We can always brand values darker if needed - but if we get too nighttime, too speedily, and so it's hard to contrary.
As we develop the darker tones found within the iris, nosotros'll pull strokes towards the pupil. The pressure placed on the pencil is varied in order to create variety in the tone. This results in a pattern that closely resembles the design of color that nosotros observe on the inside of the iris.
To shine the application, a blending stump is used. Directional stroking is important with the blending stump. Strokes should exist pulled in the same direction as the pencil applications.
Afterward addressing the tear duct, we'll gradually piece of work our way to the eyelid and surrounding skin with the HB pencil, blending applications as we go. In this case, the skin around the eye features a variety of different tones and small imperfections. Nosotros'll vary the value in areas in order to create this illusion.
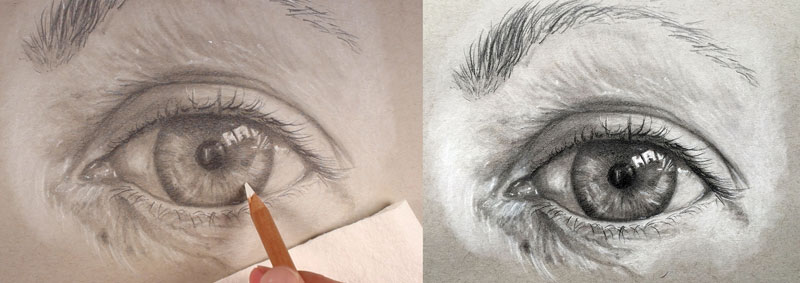
At this point, it's fourth dimension to start pushing the values even darker. Nosotros'll switch over to a 2B pencil, which is darker and softer than the HB. The pupil is darkened, again leaving space for the potent highlight. The darkest shadows under the upper eyelid and the crease created by the eyelid are darkened.
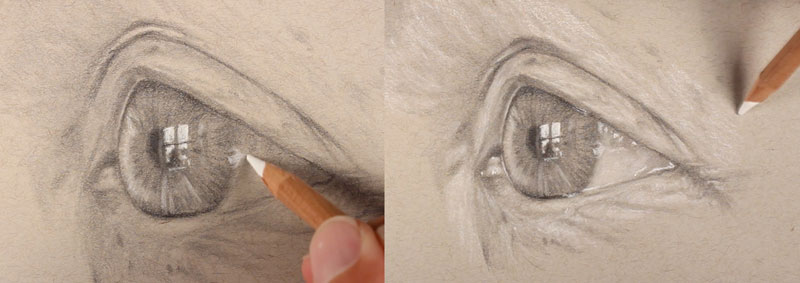
Since nosotros're working on toned paper, we take the do good of adding highlights with a white drawing medium. In this example, a white charcoal pencil is used since it can be composite with a blending stump. The strongest highlight on the center is addressed first, applying heavy pressure on the pencil. Then with lighter pressure level, we can begin addressing the areas that are lighter in value, including the "white" of the eye.
Just as nosotros did with the graphite applications, we'll blend the white charcoal applications with a blending stump. Not only does this eradicate some of the texture produced by the paper, but it helps to create transitions of tone betwixt the darker areas and lighter locations. The potent highlight in the eye is not blended since we want this surface area to remain strong.
Now nosotros'll bring some of the white charcoal to the peel effectually the eye and gently blend the material with a blending stump.
We'll likewise add some of the strong highlights that occur on the bottom eyelid. Just as the highlight added within eye fabricated information technology appear wet, these highlights serve the same purpose. To ensure the highest level of contrast, we'll avoid blending these locations with a blending stump.
Then, with our initial highlights in place, we'll switch to an fifty-fifty darker, 4B pencil. We'll begin pushing the contrast, starting with the darkest locations in the educatee.
How to Describe Eyelashes
Once nosotros've established some of the darkest tones, nosotros're ready to draw the eyelashes. This office of the process can seem intimidating since we'll brand marks over portions of the eye and the surrounding skin. However, at that place is a method that we can utilize to ensure that our eyelashes appear realistic.
This method involves thinking of the eye as quadrants. Past dividing the middle into 4 quadrants, we tin can make decisions concerning the direction of the strokes for each eyelash and the direction of these strokes.
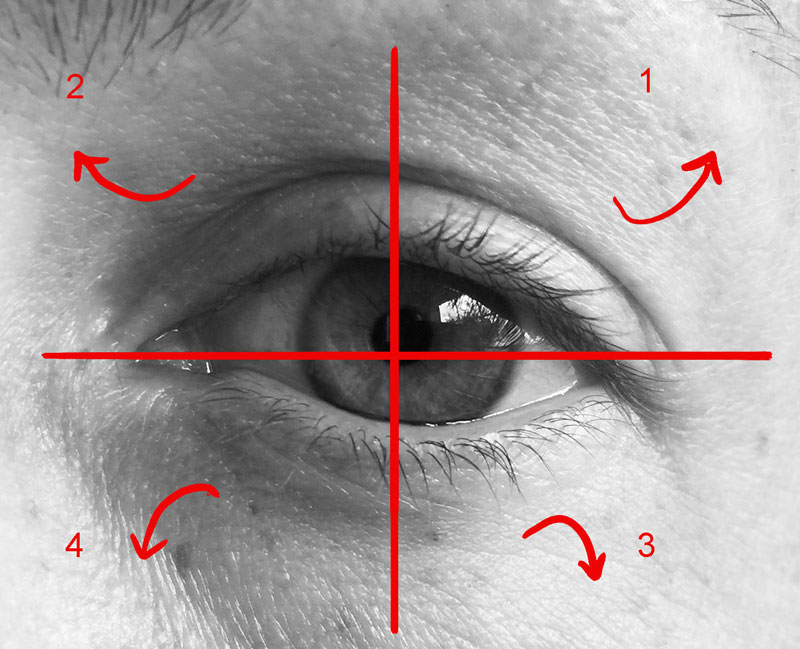
In quadrant one, we should expect to run across the longest and darkest lashes. Stokes made in this quadrant will dip downward before extending back upwards and to the correct. The eyelashes are the about dumbo and frequent in this quadrant.
As we near the middle dividing line, the strokes brainstorm to become more than vertical.
Quadrant 2 has the 2nd near number of eyelashes. In this quadrant, the strokes dip downward before extending support and the left.
In quadrant 3, we run into less eyelashes. They are more thin and much shorter. We can oftentimes notice a spacing created by the lower eyelid of bare skin. The eyelashes in this quadrant bow upward slightly before extending downward and slightly to the right.
Quadrant 4 has the least corporeality of lashes and in some cases, yous may notice that this surface area is completely void of any eyelashes at all. Eyelashes that y'all detect in this quadrant bow upward slightly before descending and slightly extending to the left.
By breaking down the eye into four quadrants, we tin approach the procedure of drawing the eyelashes with more confidence.
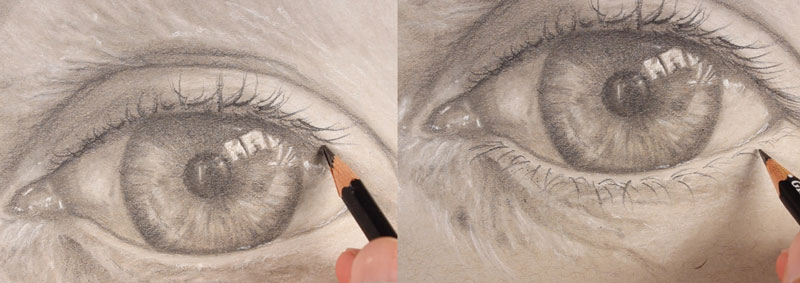
Find a identify to brainstorm that's comfortable for you. In this example, nosotros'll start about the center, in quadrant ii, pulling strong strokes down and slightly to the left. Nosotros'll gradually work our style across the upper eyelid, using a sharpened 4B pencil. Vary the management of your stroke, allowing it deviate slightly from the formula we discussed.
Afterward working our style beyond the tiptop of the middle, we'll address the eyelashes found on the lower chapeau. Again, nosotros'll start on the left side, in quadrant 4. We'll piece of work our way beyond, leaving a visible portion of skin between the centre and eyelash.
How to Draw Eyebrows
The eyebrows are simply smaller hairs that extend out from the skin in a higher place the middle. Just like optics, eyebrows come in many unlike shapes and sizes. Information technology may be helpful to lightly draw the shape of the eyebrow earlier drawing any of the actual hairs. After defining the shape, we tin can make deliberate strokes with a sharpened 4B pencil, pulling out each stroke.
Closer to the bridge of the nose, these strokes may be nearly vertical. As the eyebrows extend outward, the hairs commonly become longer and more horizontal. Again, we'll vary the stroke. Some marks should exist darker and thicker, while others could be slightly thinner and wispy.
Softening the strokes with a blending stump makes the eyebrows appear more than realistic. Just every bit we did before, strokes made with the blending stump should flow in the same management as the pencil marks.
Finishing Touches
Now we'll complete our second drawing by calculation a few additional highlights with the white charcoal pencil. We may choose to strengthen the highlights in areas to increase the contrast and broaden the range of tone.
We tin also wait for opportunities to make the values darker in areas. Nosotros can revisit areas such every bit the pupil and shadow under the eyelid with the 4B pencil. Nosotros'll go on to push the relationships of the highlights and shadows until we're satisfied with the range of value, contrast, and texture.
How to Draw an Centre from a Side View (Profile)
Nosotros don't always run across the center from a frontal view. In fact, in many portraits, the eye is positioned in a different place depending on the angle. For this reason, we'll take a slightly different arroyo. The steps involved are similar, but slightly different.
Using a Mini-Grid
To better understand the positioning of the contour lines, it may be helpful to sub-sect the subject into a mini-grid. You can exercise this past simply drawing two intersecting lines over your reference photo. Draw a vertical line and so that it overlaps the pupil. Then draw a horizontal line from one corner of the eye to other. Depending on the angle of the eye, you may be left with a skewed grid. This is fine since you tin can still utilize these lines to make comparisons, which is the purpose of the grid.
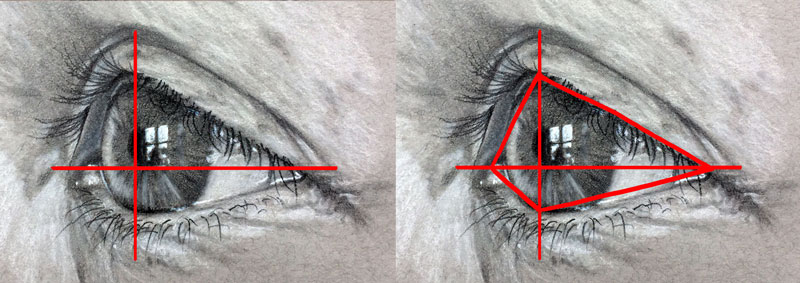
Using the intersecting lines every bit a guide, we tin depict a few more than straight lines to designate the outer edges of the middle. Diagonal lines are fatigued from the pinnacle and bottom of the center to each corner. Cartoon the mini-filigree is completely optional, but it may be helpful if you observe it difficult to locate the contours.
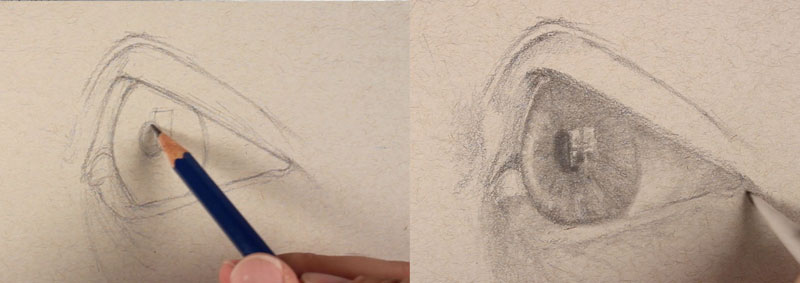
At present we can begin drawing the profile lines. Exist sure to draw shapes for the educatee, iris, tear duct and the strong highlight. Since the eye is viewed from an bending, the shapes of the pupil and iris will not be circles. Instead, these shapes are ellipses, which is a baloney of a circumvolve.

After drawing the profile lines with a low-cal, H pencil, nosotros tin can begin calculation some of the darker values. Initial applications tin be made with an H or HB pencil. Outset in the locations that are the darkest, making sure to preserve the areas of strongest highlight.
For the patterns of the iris, we'll once more pull strokes from the pupil. In many cases, the tone becomes quite dark around the outer edges. Yous may use a darker pencil here or simply apply more than pressure. We'll besides be sure to add together a cast shadow underneath the eyelid. To eliminate some of the texture of the paper, nosotros'll use the blending stump to smooth our applications as we go.
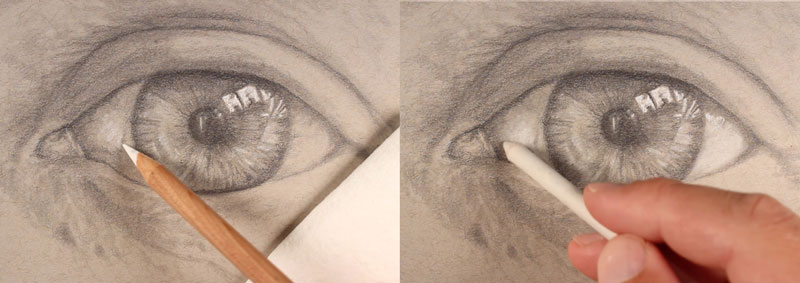
With our initial darker tones in place, nosotros can begin adding the highlights with a white charcoal pencil. We'll start with the strong highlight that overlaps the iris and the student, applying heavy pressure. As we did before, we'll utilise less force per unit area every bit we address the lighter values of the "whites" of the centre, the tear duct, and the surrounding skin.
Again, the blending stump is used to soften the texture. To make the centre appear wet, additional strong applications of the white charcoal are applied to portions of the "white" areas along with a couple of marks applied within the tear duct.
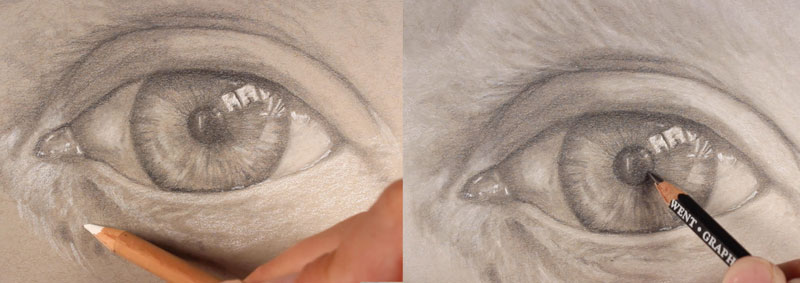
After adding the lighter values, we tin go back with a softer 4B pencil and brand some of the shadows darker. This makes the highlights appear stronger since the range of value is increased.
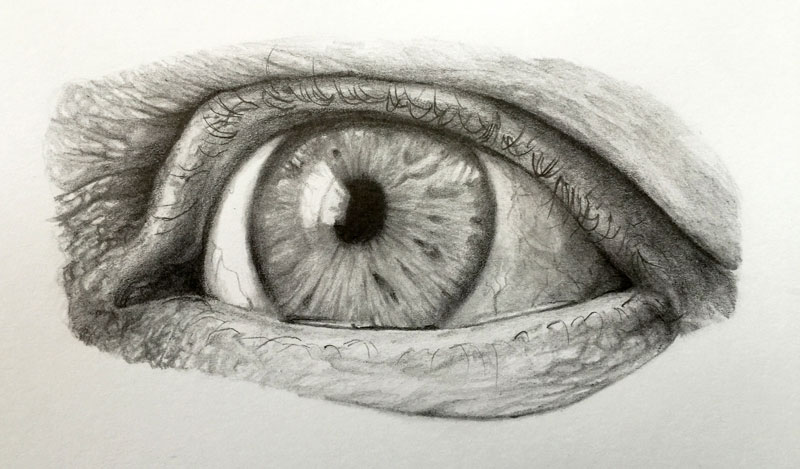
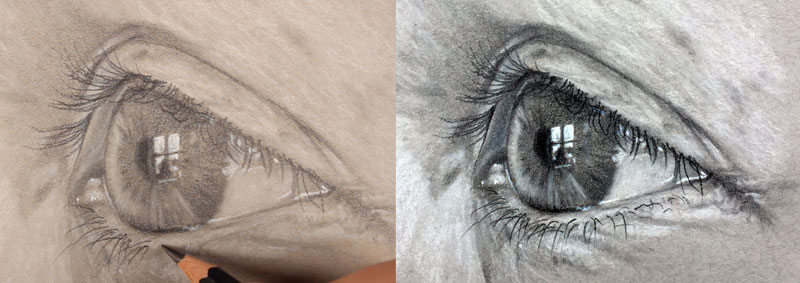
Now we'll add the eyelashes. Nosotros'll need to remember most the angle of the heart in order to create convincing eyelashes. Logically, the strokes created for the eyelashes should dip downwards and extend dorsum up slightly. Simply from this bending, you'll notice that some of the meridian eyelashes may non fifty-fifty make it back up to the eyelid. Nosotros can meet this in the image below. Notice how the top eyelashes on the right side of the eye merely extend down and slightly to the right.
You'll as well find that we can see a flake of the skin of the upper eyelid on the left side of the eye. In other words, the eyelashes extend out from the eyelid, not the eye itself.
In this example, nosotros can conspicuously come across that this also happens for the lesser lashes. Once again, allow some variety in the strokes. Some should be longer, while others are shorter. The strokes should also change management slightly.
In guild to increase the contrast, yous may find that you need to revisit areas with darker and lighter applications to finish the drawing.
The Location of Eyes on the Face
At present that we've had a comprehensive look at drawing an middle, let's briefly discuss the location of the eyes relative to the head.
Since the eyes are clearly positioned on a face. Y'all may cheque out this lesson on drawing a confront...
- How to Depict a Face up
It is often assumed that the eyes are positioned at the top of the head. Instead, the eyes are establish in the middle of the head. If we draw a line from the top of the caput (excluding the hair) to the bottom of the mentum, we can wait to observe the eyes in the eye. This assumes that you're looking directly at your subject. If the caput is tilted, or viewed from a different angle, then the positioning will also be dissimilar.

The Size of the Eyes
Just like with any of the other facial features, your optics need to be proportional to the head. An easy manner to ensure that your proportions are right is to draw 5 lite ovals that match the width of your eyes across the face from the end of one ear to the other. Most heads are approximately "5 eyes" wide. If you find that you can fit more ovals in this space, then your eyes may have been drawn too small. If y'all cannot fit 5 ovals across this width, then your eyes may have been drawn likewise large.
Final Thoughts on Cartoon Optics
1. Expect at the eyes that you are trying to draw - I know - this tip seems pretty obvious. But many people try to draw what they call up they see, rather than what they really see. Look at the shapes, lines and values and do your best to re-create that info on your newspaper. Don't call back about drawing optics, think well-nigh drawing shapes, lines, and values.
2. Remember that every eye is dissimilar - No two eyes volition ever look the same.
three. Eyes are their own unique shape - Eyes are NOT ovals and eyes are NOT football shapes. They have their own unique shape that yous must recognize. (See tip #1)
4. Eyes accept a full range of value - Most anything that you lot draw or pigment should contain a full range of value. Optics are no unlike. If you need to use a value scale to ensure that you accept used a full range of value - then do it. The darkest darks and the lightest lights should all exist there.
This lesson explored drawing a realistic center with graphite pencils. And while many of the concepts that we covered here carry over to other drawing mediums, it may be helpful to run across how this process is slightly dissimilar when a different drawing or painting medium is used.

Source: https://thevirtualinstructor.com/Graphiteeye1.html
Posted by: gordonlievaight.blogspot.com
0 Response to "How To Draw Side Profile Eyes"
Post a Comment